Hi all I've never encoded a macro and I'd like to learn because I'm coming up against a problem:
Currently I'm looking for a " simple " solution to place solidworks parts in a layer during drawing (For the moment in the software, the only way is to hide the parts I don't want, then the ones that remain, select them one by one and then assign them to a layer. Suffice to say that it's tedious). The other way is to export the plan with colors and then in the 2D software like Autocad, assign the layers according to the colors. In short, a hell... I browse all the forums and sites in English and French but I can't find anything... However, it seems to me that I must not be the only one in this impasse.
So, do you know, please, a macro capable of linking parts directly to layers? (Namely that my assemblies are the same with all the same parts, and few parts. But in a launch of 200 assemblies, it can take time to sort each piece).
Otherwise, do you know where I can learn on the net, the basics to encode in VBA? Because I think it's going to be the only possible solution.
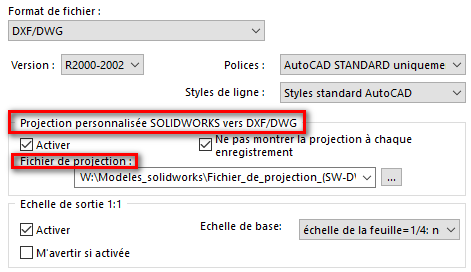
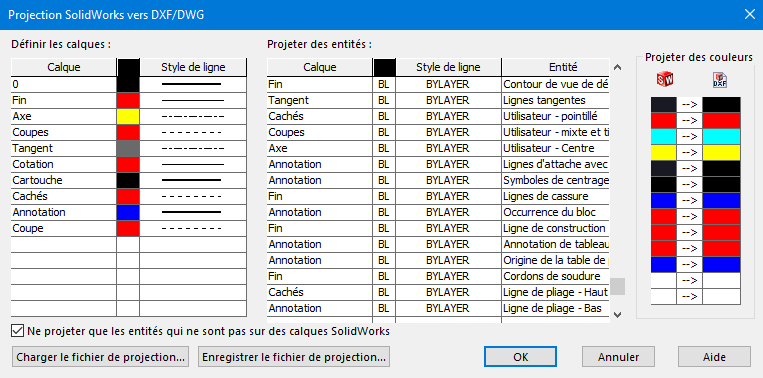
Be careful, Solidworks does not manage layers as Autocad would... It is possible to create a Projection file for recording drawings in DWG and DXF (file-> save as DWG/DXF then " Option ")
But overall Solidworks only handles stroke types (and some stroke colors) but not 3D components...
Regarding macros, here are some sites to start getting familiar with VB programming...
and more generally (Excel-oriented VBA but still useful):
and Solidworks API helpers.
Note: to start with, I don't recommend automatic macro recording and generative artificial intelligence (although some progress is notable on some " AIs "...)
Thank you for the answer Indeed I also know the export method, but it's not exactly what I'm looking for. I managed to manually put a layer to a part or a whole component, so I tell myself that it can be automated, it's more in this direction that I block. Thank you for the links I feel that the brain will smoke a little
How much easier would it be to " automate " changing a component's layer with a macro? Unless the component(s) in question are still the same (Library components?) you will always have to go through the " Selection " phase of the part or assembly, then, probably, the choice of the layer to which to export them... note: Be careful not to confuse line style, line font and layers...
… The API help code with some additional comments:
Option Explicit

' Cette sous-procédure modifie le calque d'un composant dans un document de dessin SolidWorks
Private Sub ChangeComponentLayer(swApp As SldWorks.SldWorks, swDraw As SldWorks.DrawingDoc, swDrawComp As SldWorks.DrawingComponent, sLayerName As String)

    Dim bRet As Boolean

    ' Former un nom de calque valide en remplaçant les symboles
    ' barre oblique (/) et arobase (@) par des traits de soulignement (_)
    sLayerName = Replace(sLayerName, "/", "_")
    sLayerName = Replace(sLayerName, "@", "_")

    ' Créer un calque avec le nom formé et ajouter une assertion de débogage
    bRet = swDraw.CreateLayer(sLayerName, "layer for " & sLayerName, 0, swLineCONTINUOUS, swLW_NORMAL, True): Debug.Assert bRet

    ' Définir le calque du composant de dessin sur le nouveau calque
    swDrawComp.Layer = sLayerName

End Sub

' Cette sous-procédure traite un composant de dessin, modifie son calque,
' et traite récursivement tous ses composants enfants
Sub ProcessDrawingComponent(swApp As SldWorks.SldWorks, swDraw As SldWorks.DrawingDoc, swDrawComp As SldWorks.DrawingComponent, sPadStr As String)

    Dim vDrawCompChildArr As Variant
    Dim vDrawCompChild As Variant
    Dim swDrawCompChild As SldWorks.DrawingComponent

    ' Afficher le nom du composant dans la fenêtre de débogage
    Debug.Print sPadStr & swDrawComp.Name

    ' Changer le calque du composant actuel
    ChangeComponentLayer swApp, swDraw, swDrawComp, swDrawComp.Name

    ' Obtenir tous les composants enfants du composant actuel
    vDrawCompChildArr = swDrawComp.GetChildren

    ' Vérifier s'il y a des enfants et les traiter récursivement
    If Not IsEmpty(vDrawCompChildArr) Then
        For Each vDrawCompChild In vDrawCompChildArr
            Set swDrawCompChild = vDrawCompChild
            ' Appel récursif pour traiter chaque composant enfant
            ProcessDrawingComponent swApp, swDraw, swDrawCompChild, sPadStr + "  "
        Next
    End If

End Sub

' Cette procédure principale initialise les objets SolidWorks nécessaires
' et commence à traiter les composants de dessin sélectionnés
Sub main()

    Dim swApp As SldWorks.SldWorks
    Dim swModel As SldWorks.ModelDoc2
    Dim swDraw As SldWorks.DrawingDoc
    Dim swSelMgr As SldWorks.SelectionMgr
    Dim swView As SldWorks.View
    Dim swDrawComp As SldWorks.DrawingComponent
    Dim bRet As Boolean

    ' Obtenir l'instance active de SolidWorks
    Set swApp = Application.SldWorks

    ' Obtenir le document actif (qui devrait être un dessin)
    Set swModel = swApp.ActiveDoc
    Set swDraw = swModel

    ' Obtenir le gestionnaire de sélection et la vue sélectionnée
    Set swSelMgr = swModel.SelectionManager
    Set swView = swSelMgr.GetSelectedObject6(1, -1)

    ' Obtenir le composant de dessin racine de la vue sélectionnée
    Set swDrawComp = swView.RootDrawingComponent

    ' Afficher le nom du fichier et la vue sélectionnée dans la fenêtre de débogage
    Debug.Print "File = " & swModel.GetPathName
    Debug.Print "  " & swView.Name & "  [" & swView.Type & "]"

    ' Commencer le traitement du composant de dessin racine
    ProcessDrawingComponent swApp, swDraw, swDrawComp, "    "

End Sub
And some explanations of the different procedures:
Sub-procedure ChangeComponentLayer :
Transform the layer name to avoid invalid characters and creating the layer in the drawing document.
Sub-procedure ProcessDrawingComponent :
Recursive processing of drawing components and layer switching for each component, as well as displaying debugging information.
Main proceedings main :
Initialize the necessary SolidWorks objects, select the view and components, and initiate the component processing process.
… and a little tutorial for the execution of this macro on a Solidworks drawing... Be careful, on a copy of an MEP... You never test a macro on the original files at the risk of losing everything... (it is rare that you can go back with a MAcro).
Step 1: Prepare the Environment
Open SolidWorks Launch SolidWorks and open a drawing document (Drawing) that you want to process with the macro.
Verify Components and Views Make sure that the drawing contains components and views that you want to manipulate. The macro acts on the drawing components and their layers (layers).
Step 2: Access the VBA Macro Editor
Open the Macro Editor In SolidWorks, go to the Tools menu > Macro > New to create a new macro, or Run to open an existing macro.
Create a New Macro
If you choose to create a new macro, SolidWorks will prompt you to save the file with a .swp.
Give your macro a name, like ChangeLayerMacro.swp, and save it in an easy-to-access place.
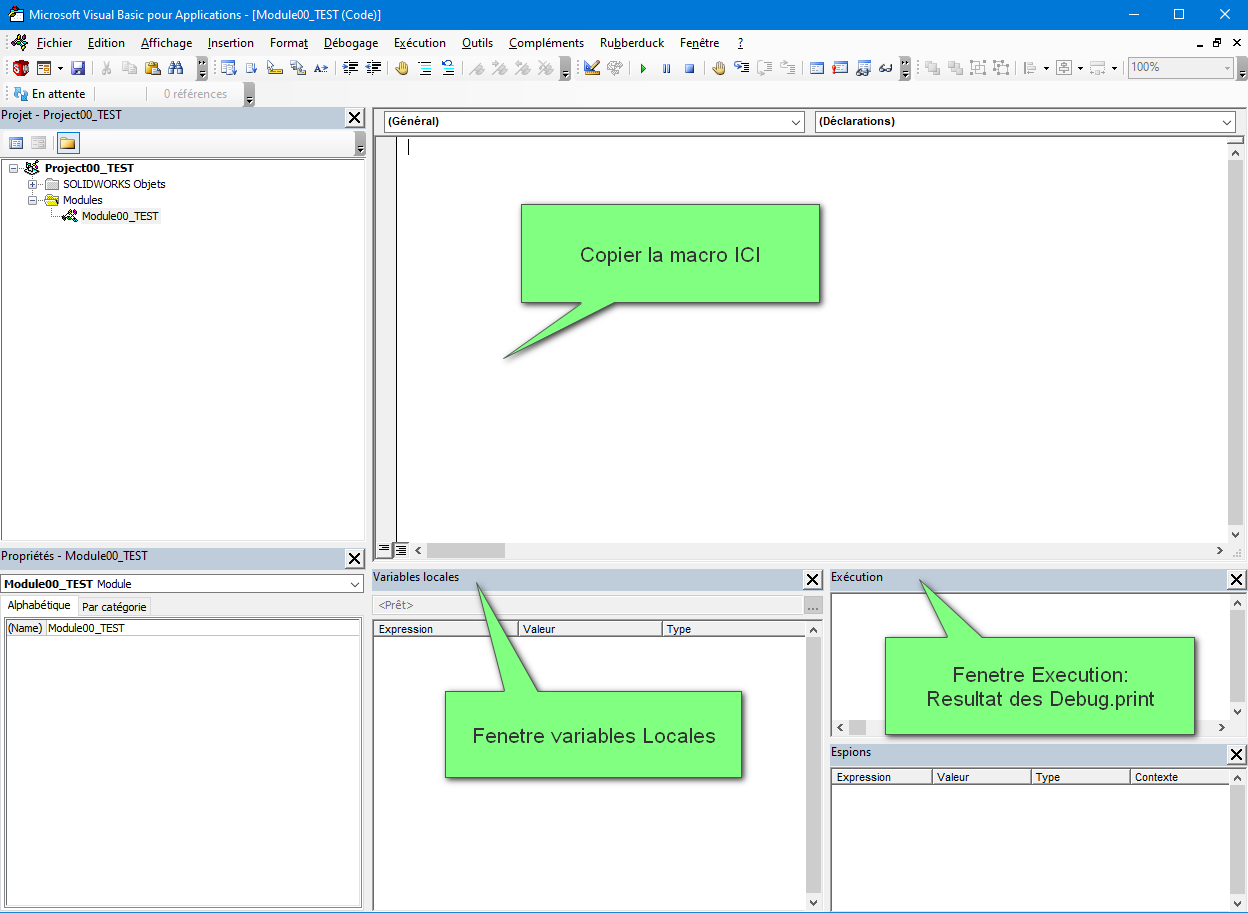
Step 3: Copy VBA Code to the Editor
Open the Visual Basic for Applications (VBA) Editor Once the macro file is created, SolidWorks will open the VBA editor.
Paste VBA Code
Copy the VBA code (provided above) into the VBA editor.
Paste it into the empty macro module that was created automatically.
Make sure that all code is pasted correctly, including declarations Option Explicit and all subprocedures.
Step 4: Save and Close VBA Editor
Click File > Save or use the shortcut Ctrl + S to save the macro.
Close the VBA editor once the macro is saved.
Step 5: Run the Macro in SolidWorks
Select a View in the Drawing Before you run the macro, make sure that you select a drawing view in the current document, because the macro expects you to have a view selected to process its components.
Run the Macro Return to the Tools menu > Macro > Run.
Browse through your files and select the macro .swp you saved earlier.
Click Open to run the macro.
Note: Personally, I prefer to launch the macro directly from the VBA editor using the step-by-step mode (F8) and analyze the actions and results in the editor's execution window while keeping an eye on the local variables window
Step 6: Check the Results
After the macro is executed, the Immediate window in the VBA Editor (if open) or the SolidWorks Output Console will display the results of the macro, including the names of the processed components and their new layers.
Verify in the SolidWorks drawing that the components have been moved to the new layers as expected.
Points to Check and Troubleshoot
Version Compatibility : Make sure that your version of SolidWorks supports running VBA macros. Some restrictions may apply depending on the version.
Macro Security : If SolidWorks displays a macro security warning, make sure that you have set the macro security settings to allow execution.
Error Messages : If you encounter errors, verify that you have selected a valid view and that the drawing is configured correctly with components.
Summary
By following these steps, you can use the VBA macro to change the layers of components in a SolidWorks drawing in an automated and efficient way. This macro is particularly useful for organizing complex drawings with multiple components by creating and assigning layers automatically based on component names.
Thank you very much for these elements, it's very kind. So I actually tried this macro (the initial one on the site, not the one you copied). The thing is, it creates one layer line per piece. So I end up with a lot of layers, which is uncomfortable and unusable, but it's already a start.
In your previous question about what would be easier with automation, it's that I actually end up with the same parts repeated x times. So you might as well group everything with a macro, rather than manually selecting these elements and then placing them in the respective layers.
In fact I have to set up a CAPM but keeping this current practice of the company of using 2D layers for customer exports (archi, or BE). And the goal is to avoid wasting unnecessary time that will put off my colleagues when I am going to deliver the project to everyone. Currently I use the Swood software on Solidworks, and there are no worries about the encoding, it's very easy, even with complex components. But the drawing must also be easy to access for my colleagues.
I will continue to work on the issue with your elements!! Thanks again for your time, it's super nice Have a nice day
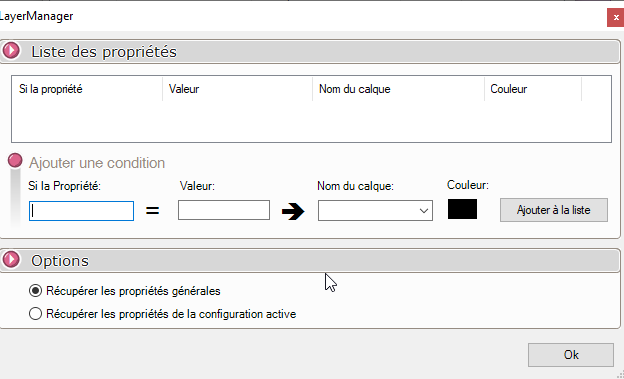
Otherwise there is this utility in the MyCADTools suite at Visiativ if you have trouble developing your macro:
Eventually you can test it in a trial version to see if you can get what you want. In particular, it is possible to move a part to a certain layer according to a property: