Bonjour;
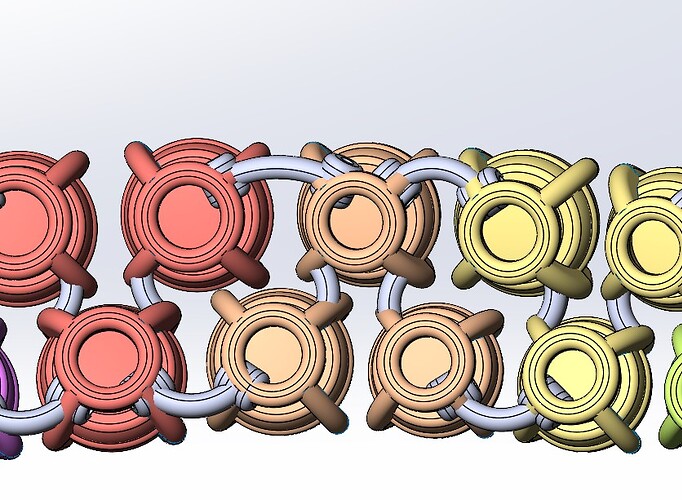
Je fais un assemblage de pièces dérivés(A) qui sont connectés avec une autre pièce dérives(B).
Ma question est comment puis je altérer mon connecteur (B) afin qu’il se fixe au même endroit de mes pièces (A) et de chaque cotes (CF photo)
Merci d’avance.
Bonjour @flavie_michou
Je me demande si ton utilisation de la pièce dérivé est pertinente dans le cas présent.
Tel que je comprends ton image, il s’agit d’un aggloméra de plusieurs pièces A&B … du coup, pourquoi ne pas faire un assemblage qui te permet beaucoup plus de libertés tant qu’à la gestion de ta pièce B ?
Merci, effectivement la pièce B (emmaillement) n’a pas besoin d’avoir de dérivé mais elle a besoin d être flexible en fonction des distances de pièces A.
Attention les pièces A ont des espaces différentes et ne peuvent pas être déplacé.
Je ne connais pas votre background professionnel, ni si vous avez déjà utilisée d’autre logiciel. Mais le concept de rigide contre flexible n’est pas le même pour Solidworks que pour Créo par exemple.
Dans Solidworks :
Si vous avez un assemblage avec des composants mobiles, rigide signifie que tout est relativement fixe (en place les uns avec les autres) alors que flexible signifie que les pièces peuvent se mouvoir … tout en respectant les contraintes préalablement définies.
Dans Créo :
Une pièce définie comme flexible dans un assemblage peut changer dynamiquement de forme. (et c’est ultra pratique !)
Depuis 2020 (je crois), Solidworks permet un changement de forme dynamique dans certains cas, en utilisant des références contextuelles dans la conception d’assemblage descendant.
Par exemple avec des ressorts : il est créer à partir d’une surface balayée torsadée où la longueur est contrôlé à l’aide d’une référence contextuelle. Celà signifie qu’à chaque reconstruction, le ressort se déforme comme il se doit.
Si vous aviez deux plaques et une tige entre elle avec un ressort (un amortisseur en somme !), le chemin de balayage pourrait être défini à l’aide d’une ligne entre les deux plaques. Ainsi, chaque fois que la distance de la plaque change, la longueur total change.
Celà est bien jolie, mais semble fonctionner pour une unique pièce dans l’assemblage et ne semble pas pouvoir être pris en compte pour plusieurs pièce avec plusieurs longueurs.
Exemple d’ajout d’un composant flexible - 2023 - Aide de SOLIDWORKS
Du coup, dans votre cas prècis, il semble être plus judicieux de faire différentes configurations de la pièce B aux bonnes dimensions et d’appeler la bonne config au bon endroit
Hello,
Dans SolidWorks c’est pareil ! Et l’exemple que tu donnes avec le ressort est un bon exemple et il fonctionne pour toutes les instances d’un composant.
Il y a effectivement la notion d’assemblage ET de pièce flexible dans SolidWorks.
→ plusieurs instance d’un même ressort dans un assemblage, s’il sont défini en tant que composant flexible, peuvent se déformer chacun indépendamment selon le contexte de l’assemblage.
Pour en revenir à la demande de @flavie_michou :
Pourriez-vous svp être un peu plus clair ? On devine quelle est la pièce A, la pièce B… mais on ne sais pas si vous travailler dans un fichier assemblage (la notion de dérivée ayant été citée, ça peut mettre le doute), et pour ma part j’essai encore de comprendre comment doivent se lier les composants entre eux.
Est-ce que les fichiers et un schéma de principe peuvent être partagés ?
Je me suis rendu compte dans mon explication que je me suis perdu !
Pour ce que j’en sais : dans Créo je peux modifier n’importe quelle dimension en « flexible » en fonction de ton besoin. Alors que dans Solidworks c’est dépendant de contraintes préalablement choisie/déclarée
Merci beaucoup pour les infos, par contre j 'ai l’impression que les ressorts peuvent uniquement être contrôlé par des axe, hors dans mon cas les emmaillements sont courbés
Oui, je travaille sur un assemblage. La piece B est constitué de 3 charnons de chaque cotés dont ceux des extremites feront partis des pieces A
Je pense que vous pourriez obtenir le résultat souhaité en construisant un premier connecteur dans le contexte de l’assemblage.
Il va être très difficile d’expliquer la méthode à l’écrit, c’est pourquoi je demandais le partage des fichiers CAO, mais essayons quand même :
- Construisez votre connecteur en vous basant sur des géométrie de référence elle-même construite à partir d’élément du contexte de l’assemblage (géométrie des pièces A)
Utilisé une cotation de longueur de trajectoire pour permettre à la géométrie de se tordre de façon pertinente
Insérer une nouvelle instance du connecteur et définissez le en tant que pièce flexible. Vous serez invité à remplacer les références externe du connecteur.
merci beaucoup, je viens de creer un fichier test en esperant que cela puisse etre plus simple (test A est tout simplement un cylindre que je ne peux pas envoyer car limité a deux pieces ![]() )
)
test A B.SLDASM (700,5 Ko)
test B.SLDPRT (905,8 Ko)
??
Sans l’assemblage complet, difficile de comprendre comment les pièces se lient entre elles…
Est-ce que l’assemblage ci-dessous présente le comportement recherché ?

Part2.SLDPRT (128,6 Ko)
Assem1.SLDASM (199,8 Ko)
Ah oui c’est génial ça ! Vous pouvez m’expliquez comment vous avez fait? Mille merci ![]()
-
les cylindres et l’assemblage Assem1 sont réalisé en premier.
Le cylindre comporte les éléments nécessaires à son positionnement dans l’assemblage → regarder l’esquisse qui a servi à l’extrusion, en plus du cercle, j’ai prévu les lignes de construction qui s’étendent au-delà du cercle. Les points d’extrémité des lignes de construction a l’extérieur du cercle sont les références des contraintes de coïncidence dans l’assemblage.
Il comporte également des plans de référence qui serviront à la construction de la pièce Part2. -
La pièce Part2 est construite dans le contexte de l’assemblage.
je vous laisse étudier sa construction en sachant que le préfix « -> » dans l’arbre de construction indique que la fonction/l’esquisse référence un élément externe. -
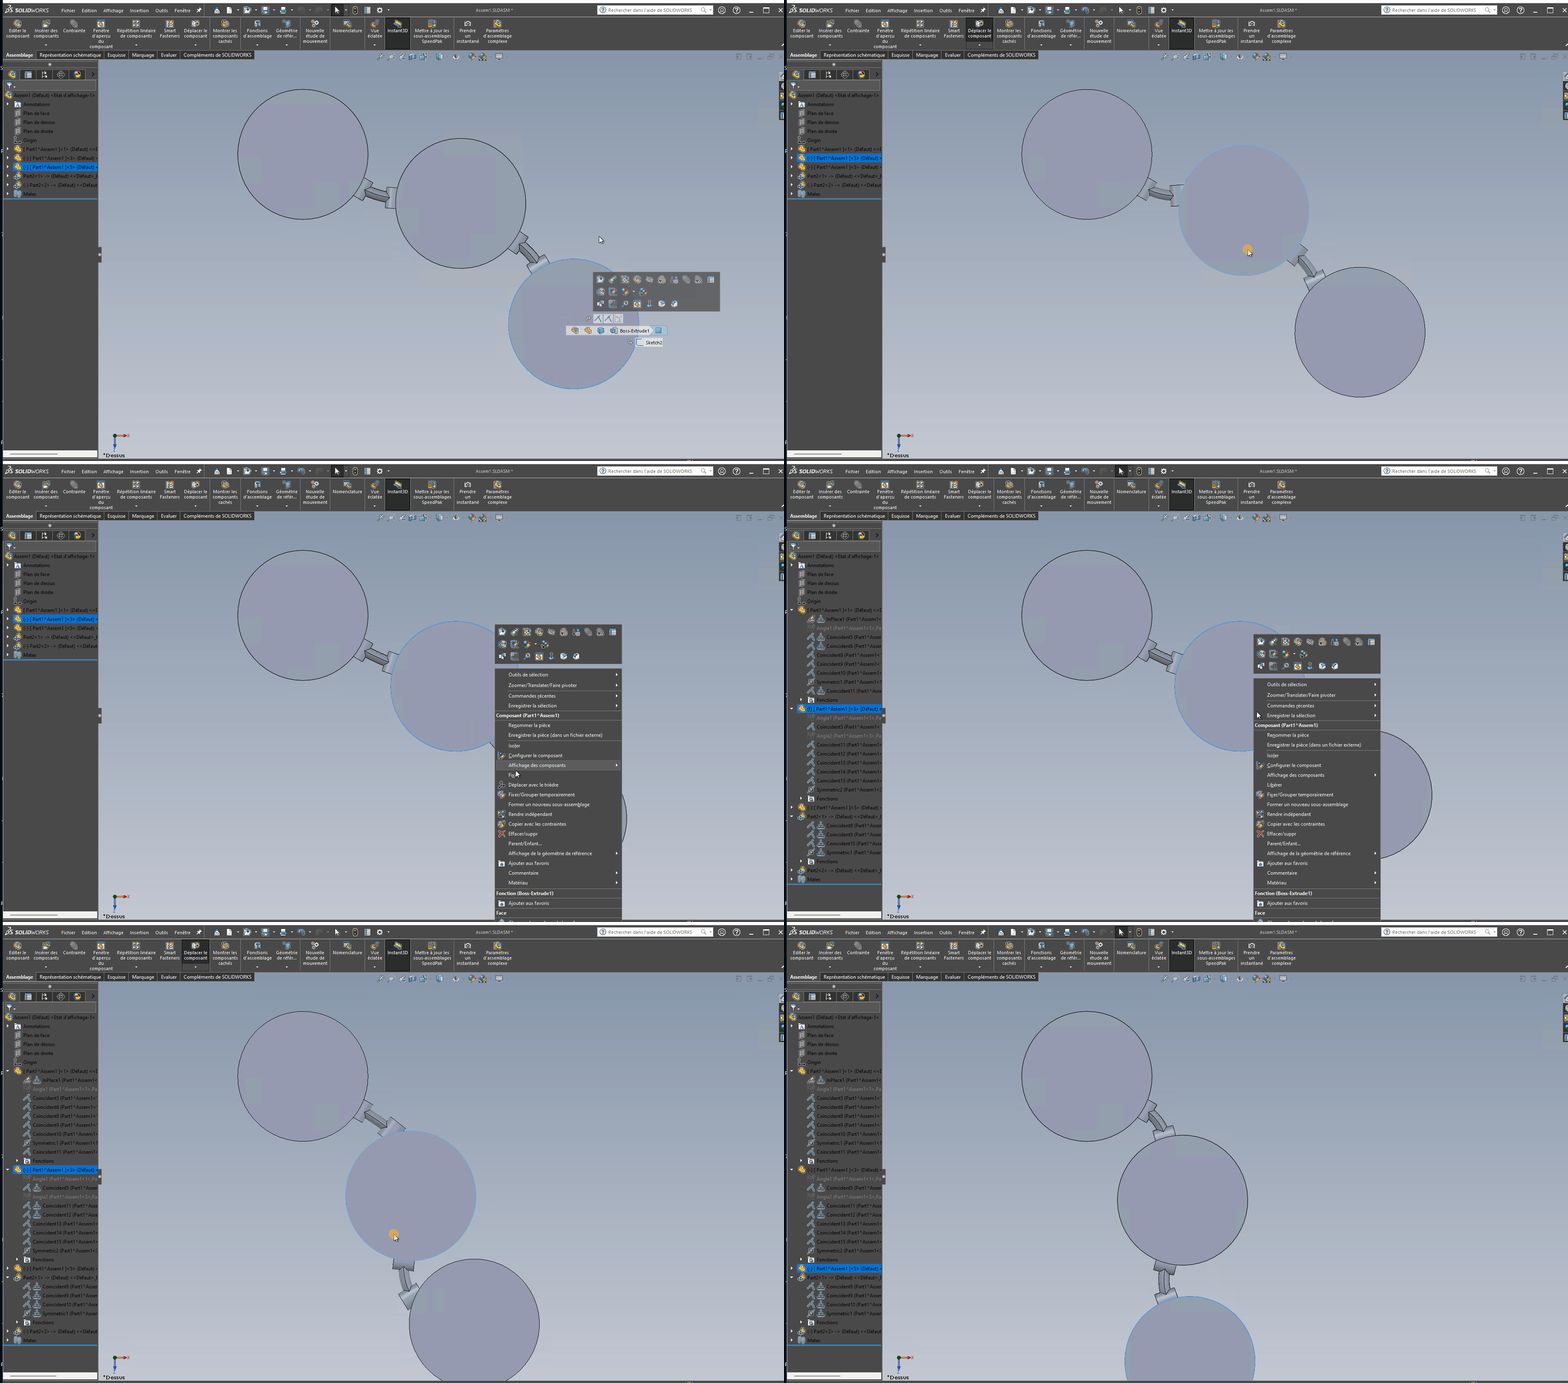
La dernière étape consiste à convertir la pièce en flexible (clique droit sur le composant dans l’arbre, puis clic sur Rendre la pièce flexible

Vous serez invité à ce moment là a redéfinir les éléments externe référencé en fonction du contexte.
Ceci sera à faire pour toute les instances du composant que vous mettrez dans l’assemblage.
ATTENTION : le fait de rendre flexible une pièce ou un sous-assemblage affecte les performances.
En espérant avoir pu vous aidez… Bon courage et bonne continuation !
Si c’est ok pour vous, merci de clore le sujet en sélectionnant la réponse la plus pertinente.
Bonjour Silver_Surfer, désolée pour la réponse tardive, je ne trouve malheureusement pas commet faire la fonction pièce flexible.( cela fonctionne quand je rajoute une pièce dans votre assemblage mais pas dans le mien ! Par contre l’ idée est génial cela pourrait mettre régulièrement utile!
Quel pièce essayez vous d’insérer dans votre assemblage ?
Pouvez-vous fournir des copies d’écran ?
Bonjour
Avec un Clic droit sur le composant et icône « rendre flexible »/« rendre rigide ».

« Rendre flexible » est un statut, plus qu’une fonction.
Pas forcément. Tout dépend de la version de ton fichier et des « aidants ». Une photo en complément est toujours une bonne idée.
En quelle version est ton fichier ?
