Hello community.
I would like to share a problem I encountered concerning the quotation of parts in Inventor.
I am responsible for creating plans for our design office, with dimensions and tolerances specific to our department. At the same time, I also have to produce these same dimensions with different tolerances for our purchasing department.
Let's take a concrete example: For the design office, a dimension of 30 mm (30 mm is imperative because it is this value that I use to build my assembly) with tolerances of -0.1 mm and -0.6 mm required, which gives a range of values oscillating between 29.9 mm and 29.4 mm. However, our suppliers in the Purchasing department have difficulty interpreting this dimension, and so we are led to present a value of 29.65 mm with tolerances of ±0.25 mm for them, which is the same for me.
My solid model is built using the 30 mm value of the design office, to which I apply the tolerances of the design office by requesting the display of the average value, which therefore gives me a value of 29.65 mm.
When I create my plan, I retrieve this average value, but I can no longer display the nominal value unless I enter it manually.
One possible solution would be to create two versions of the part, one with a dimension of 30 mm and the other with a dimension of 29.65 mm. However, there can be problems with managing both of these versions.
Would a person have been confronted with this kind of problem and if so, how did he do it?
On Solidworks there is a utility (Tolerance:Tolerances) capable of creating a configuration of a part in medium slope to export it afterwards for example.
Let's see if this also exists on Inventor, or if a macro is able to do it.
1 Like
Hello sbadenis,
And thank you for your answer, I also have in Inventor the possibility to integrate tolerances directly on the values of my part.
And to vary them in nominal, maximum, average or minimum dimensions.
The problem is that these tolerances directly influence the dimensions of my room.
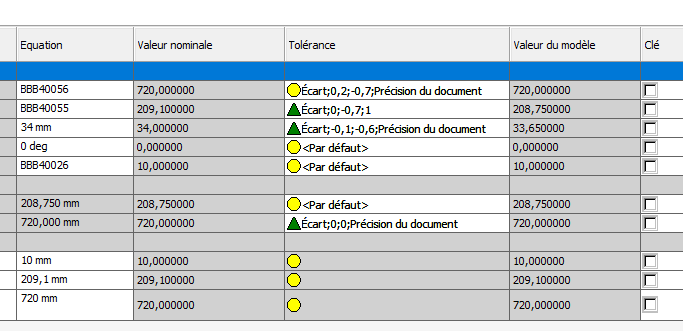
In this image, on a simple piece,

The yellow circle is to have the nominal dimensions
The green triangle is to display the average value;
Then I have a + for the max values
And one - for mini values
You can see the nominal values that I use to make my BE drawing with tolerances.
And the values of the model that are used to make a drawing for my suppliers who will have centered tolerances.
I can't make two shots (of the same room) with the two values in dynamic.
Either I have a BE plan or I have a supplier plan.
I don't know if I was clear.
Have a nice day
Hi @Franck51
Haaaaa, the sweet fantasies of purchasing departments. These are recurring requests... which I have always refused to do. If the supplier does not know how to read a plan with tolerances, it is because it is not good and that you should not go through it. And when they want to change supplier for X or Y reason, you would have to change your rating again because they don't like it.
Well, once we've said that, there's the management that enters the battle and we still have to do it well :-).
So, have you tested it by putting "notes" and entering it in manual?
I don't remember too much about Inventor, but can you make a room with a version or with a family table? You could thus manage the BE part and the supplier 1 part, then supplier2 then supplier3.
Another solution would be to ask your supplier to send you a plan with the corresponding quote and thus integrate its PDF on a second page of your plan.
1 Like
Completely agree with @coin37 no need for 2 plan.
On the other hand, the medium tolerance part is very useful for CAM.
Hence the Visiativ tolerance software on Solidworks to render the part in average dimensions (then export in step for our CAM software)
2 Likes
I like it when people are in agreement with me^^
Yes, the prod/machining prefers the average rating in general. And here, I assume that it's a method plan and no longer BE. So either the supplier to manage it (hence the PDF plan to put on your plan if you wish), or the method office if you are lucky enough to have one ... or yours with pieces with versions.
Personally, I don't really like the last solution because we always come across the special cases "usually we do it like this, but not for this part" 
2 Likes
Thank you coin37coin
I also agree with you, but I have no choice because besides the suppliers I have the quality that sticks its nose in it.
I found two solutions that I don't like either.
the first consists of creating two parts with their tolerances, one for BE and one for PURCHASE.
And the second to make a plan with dimensions and tolerance BE and a second by replacing these dynamic dimensions with values and tolerances in hard.
But if someone takes my plan to make changes in both cases there is a risk of forgetting to modify a room or the second plan and generating bad supplies or bad programs.
Hello
I do not come to provide a solution, because in my opinion there is none, in all that satisfies everyone. If the case arises I think I will attach an excel file of correspondence, with minimum, maximum and average value.
Not great I agree
1 Like
Hi everyone!
With the latest versions you can make several levels of detail in the same room, with different shapes or dimensions. For the old versions tolerance two planes differently, the main one takes the internal tolerances directly from the 3d, and the second one you redo the dimensioning, nothing complicated.
2 Likes
