During the tests in Inventor, it was possible to export the structure to the .rtd format in order to import it into the Autodesk Structural Robot calculation software.
Do you know if it's possible to do the same with SW? Should we go through another format?
We tested the . DWG, step, ifc, sat and igs but without real success....
Yes, the big problem is that we want to get the 3D sketch (the skeleton) of the structure in order to put it in Robot, but:
It seems to me (to be confirmed) that it is impossible to convert a SW sketch to a dwg or another format because the export will only take the 3D bodies.
So I'm stuck on this export point ...
@coin37coin, I can actually do this "shenanigans" by going through Inventor which converted to RTD format but I can't find this bridge between my 3D SW sketch and the DWG
But it's strange that in SAT or AICI, it doesn't work, see this video:
https://www.youtube.com/watch?v=Eb54_D4QSvo
Otherwise, the only roundabout way I see, but it can take a little time, is to export the DWG of the front, side and top views. Then in DraftSight for example, reconstruct the 3D DWG "by hand"... to export it afterwards...
I just watched your video and indeed it works on volume but I didn't manage to export a 3D sketch. I think the software converts surfaces into data but since a 3D sketch is wireframe, it doesn't find a surface.
Late answer but hey, I just did the test at a customer and in IGES by checking the export options of SolidWorks, the export of 3d sketches and or 3d curves, it works.
A question about the Autodesk Inventor Structural Analysis in Buildings. In my case when I open robot (2022 version) I can't find the complement. As its name suggests it's a complement, but when I go to the store I can't find this complement!! Robot I begin, I have only modeled a framework once
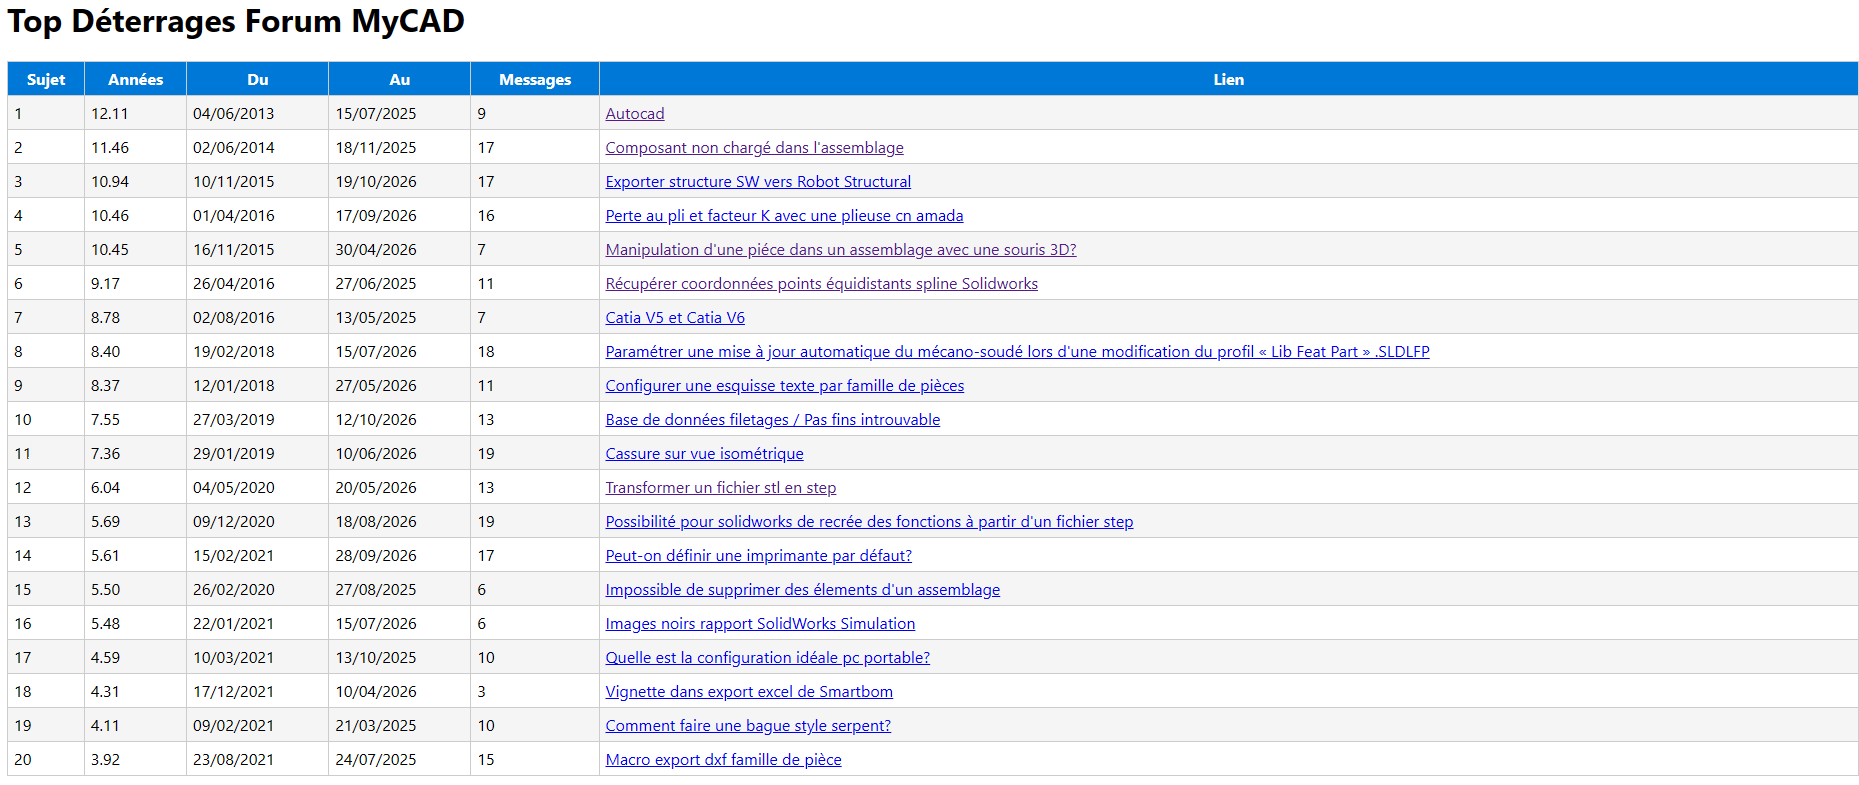
Not even, a record missed a year too early! You get on the small step of the podium on the other hand! See the attached top: Top_Deterrages_20261019_164625.pdf (93.7 KB)
It's the AI that made me the code in 10 minutes (1 or 2 corrections and functional!) And for something of importance like that, you have to spend the time you need @Le_Bidule !
PowerShell script below. I didn't know anything about it and I admit it's rather powerful and I've done other internal scripts in my company since then (still with AI since I don't know the language! For those who are interested in putting it in a file to save in .ps1 (with the notepad), then have it executed.
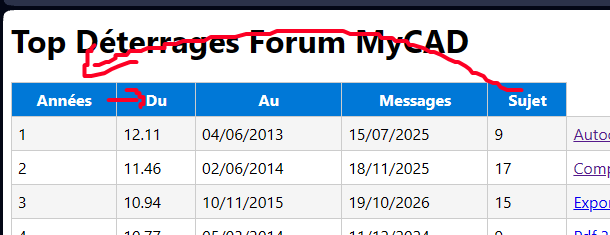
Edit: @Le_Bidule column naming error indeed. Du is the number of years between the last message and the digging. Subject replaces Year as the column title and the rest is shifted a notch to the right! I'm going to yell at the AI right now, not fucked up to do something right!
interesting all this (although...) here is the same script with comments added by the AI (The Cat):
# ============================================================
#  ÉTAPE 1 : Sélection du "Top 20"
# ============================================================
# On enchaîne trois opérations sur la variable $results :
#   - Sort-Object : trie les résultats par la propriété "Annees",
#     convertie en nombre ([double]) pour éviter un tri alphabétique
#     (sinon "10" serait classé avant "9"). -Descending = du plus
#     grand au plus petit.
#   - Select-Object -First 20 : on ne garde que les 20 premiers.
#   - Le résultat final réécrase $results (affectation avec =).
$results = $results |
    Sort-Object {[double]$_.Annees} -Descending |
    Select-Object -First 20

# ============================================================
#  ÉTAPE 2 : Préparation du nom de fichier
# ============================================================
# Get-Date -Format "yyyyMMdd_HHmmss" produit un horodatage, ex : 20261020_143521.
# Ça rend le nom de fichier unique à chaque exécution : on ne risque
# pas d'écraser un rapport précédent.
$DateRapport = Get-Date -Format "yyyyMMdd_HHmmss"

# On construit le chemin complet en interpolant la date dans le nom.
# Attention : D:\ implique que ce lecteur existe (Windows seulement).
$Fichier = "D:\Top_Deterrages_$DateRapport.html"

# ============================================================
#  ÉTAPE 3 : Construction de l'en-tête HTML (here-string @"..."@)
# ============================================================
# @"..."@" est une "here-string" : elle permet d'écrire un gros bloc
# de texte multiligne sans se soucier des guillemets.
# ⚠️ Le @" d'ouverture et le "@ de fermeture doivent être seuls sur
# leur ligne, sinon PowerShell ne reconnaît pas le bloc.
$html = @"
<html>
<head>
<meta charset='utf-8'>   <!-- Encodage UTF-8 : indispensable pour les accents français -->

<title>Top Déterrages Forum MyCAD</title>

<style>
/* CSS embarqué : mise en forme du rapport */
body{
    font-family:Segoe UI;      /* Police Windows moderne */
}

table{
    border-collapse:collapse; /* Fusionne les bordures de cellules (rendu propre) */
    width:100%;               /* Table occupe toute la largeur de la page */
}

th,td{
    border:1px solid #cccccc; /* Bordure gris clair autour de chaque cellule */
    padding:6px;               /* Espace intérieur : texte moins collé aux bords */
}

th{
    background:#0078D7;       /* Fond bleu "Microsoft" pour la ligne d'en-têtes */
    color:white;              /* Texte blanc sur fond bleu */
}

tr:nth-child(even){
    background:#f5f5f5;       /* Zébrage : 1 ligne sur 2 en gris très clair */
}                             /* → facilite la lecture ligne par ligne */
</style>

</head>
<body>

<h1>Top Déterrages Forum MyCAD</h1>

<table>

<!-- Ligne d'en-tête du tableau : une cellule <th> par colonne -->
<tr>
<th>Années</th>
<th>Du</th>
<th>Au</th>
<th>Messages</th>
<th>Sujet</th>
</tr>

"@

# ============================================================
#  ÉTAPE 4 : Génération des lignes du tableau
# ============================================================
# $rang est un compteur initialisé à 1 ; il servira à numéroter
# les lignes (1er, 2e, 3e... du top).
$rang = 1

# On parcourt chaque objet $r contenu dans $results.
foreach ($r in $results)
{
    # On fabrique un lien hypertexte HTML <a href='...'>Titre</a>.
    # Le titre du sujet "<"a ..." est construit par concaténation (+)
    # plutôt que par interpolation, pour éviter que PowerShell
    # interprète les chevrons < > ou les guillemets du HTML.
    # target='_blank' : le lien s'ouvre dans un nouvel onglet.
    $Lien = "<" + "a href='" + $r.Url + "' target='_blank'>" + $r.Titre + "</a>"

    # Ici, la syntaxe $(...) à l'intérieur de la here-string force
    # l'évaluation des propriétés : $($r.Annees) insère la valeur de
    # la propriété Annees de l'objet courant $r.
    # Sans les $(), PowerShell chercherait littéralement "$r.Annees".
    $html += @"
<tr>
<td>$rang</td>
<td>$($r.Annees)</td>
<td>$($r.Debut)</td>
<td>$($r.Fin)</td>
<td>$($r.Messages)</td>
<td>$Lien</td>
</tr>
"@

    # Incrémentation du compteur : $rang++ équivaut à $rang = $rang + 1.
    $rang++
}

# ============================================================
#  ÉTAPE 5 : Fermeture du document HTML
# ============================================================
# On ajoute les balises de fermeture </table>, </body>, </html>
# pour obtenir un document HTML complet et valide.
$html += @"

</table>

</body>
</html>

"@

# ============================================================
#  ÉTAPE 6 : Écriture sur disque et ouverture
# ============================================================
# Set-Content écrit la chaîne $html dans le fichier.
# -Encoding UTF8 : garantit que les accents (é, è...) seront
# correctement enregistrés et affichés dans le navigateur.
$html | Set-Content $Fichier -Encoding UTF8

# Write-Host affiche un message dans la console (pure info utilisateur).
# -ForegroundColor Green : texte en vert, plus visible.
# Les deux Write-Host "" vides ajoutent juste une ligne vide
# avant/après pour aérer l'affichage.
Write-Host ""
Write-Host "Rapport créé : $Fichier" -ForegroundColor Green

# Start-Process ouvre le fichier avec l'application associée
# à l'extension .html → le rapport s'affiche dans le navigateur
# par défaut. Pratique pour vérifier le résultat immédiatement.
Start-Process $Fichier
And as a bonus, the comment of the " Cat " on the script itself:
A small anomaly spotted by the way: your header row contains 5 columns (Années, Du, Au, Messages, Sujet) but each row of data produces 6 (one too many for the row). Add <th>Rang</th> to the top of the header row so that the 6 columns all have a title — otherwise the rows column has no title in the report.
And for @FRED78 I don't site the name just the link to the subject, it shouldn't become a habit or a search for the feat! Top fixed (the column names and rankings remain unchanged!)
No, this is not the feat we are looking for, this subject is interesting in my case. We work on SW and inventor, among others, and in calculation on ROBOT. In view of the modeling on ROBOT, using CAD software is a good solution.
None! It was just on another unearthed subject that I had this absurd idea but which makes me laugh! Good luck with your subject on which you will note, I have nothing concrete to offer you!





 A small anomaly spotted by the way: your header row contains 5 columns (