Hi all
I recently had a problem with the quotation in a drawing of parts.
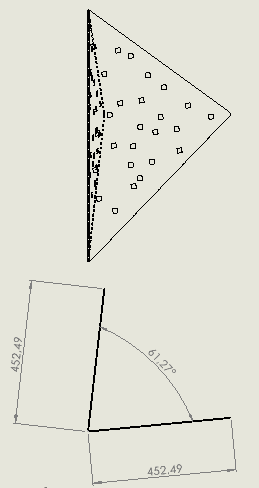
I made a front view (normal to a sketch plan), then I projected the top view.
On this top view, the dimension of my angle between the 2 faces is wrong.
The angle is 61.27°, while in reality, it should be 77.97°. I have the impression that the software took into account the 2 edges on the top, to find this angle.

Is there an option to take as a basis of dimensioning, a face (and not an edge?)
The purpose of my question is to be able to make my dimension without going through a cross-sectional view (not always easy to find depending on the case of the parts)
Thank you in advance
1 Like
Hi, welcome to the forum,
I don't know if there is a function like you ask... On the other hand, does your angle exist in your 3D part? If so, you can retrieve it in your 2D plan via "Model Objects"
Nicholas
3 Likes
When you drag your view, the software offers you projected or true sides, I think the error comes from there:
To edit, click on your view and change the option in the panel.
3 Likes
Indeed, the error comes from there.
Thank you for the feedback!
Is it possible to block this option on "projected", by default?
It is probably necessary to make the modification in the plan templates.
For me, the option is always over-projected.
2 Likes
Thank you for all the feedback.
On our side, too, the option is enabled by default. But apparently, this option sometimes "jumps", depending on certain specific cases.
We'll keep an eye on that.
Thanks again
2 Likes

